USBLITER8 is an RP2350-based service solution designed to place supported Apple A12 and A13 devices into Pwn DFU for legitimate repair, diagnostics, and recovery workflows. This guide explains how to select a compatible development board, install the correct UF2 firmware, connect the hardware safely, interpret the status LED, and solve common setup problems.
What Is USBLITER8?
USBLITER8 uses supported RP2350 development boards as USB host hardware during an Apple device service workflow. After the appropriate firmware is flashed, the board can normally be reused without reinstalling the UF2 file unless a newer firmware version is released or troubleshooting requires a clean reflash.
Supported RP2350 Boards
The firmware package includes separate builds for several boards. Always select the file that exactly matches your hardware.
| Board | Extra Hardware | Recommended For |
|---|---|---|
| Waveshare RP2350 USB-A | Standard Lightning cable | Most users; easiest setup |
| Raspberry Pi Pico 2 | Verified wired cable or USB breakout board | Experienced technicians |
| Waveshare RP2350 Zero | Connection method appropriate for the board | Compact service setups |
| Pimoroni Tiny2350 | Connection method appropriate for the board | Advanced custom setups |
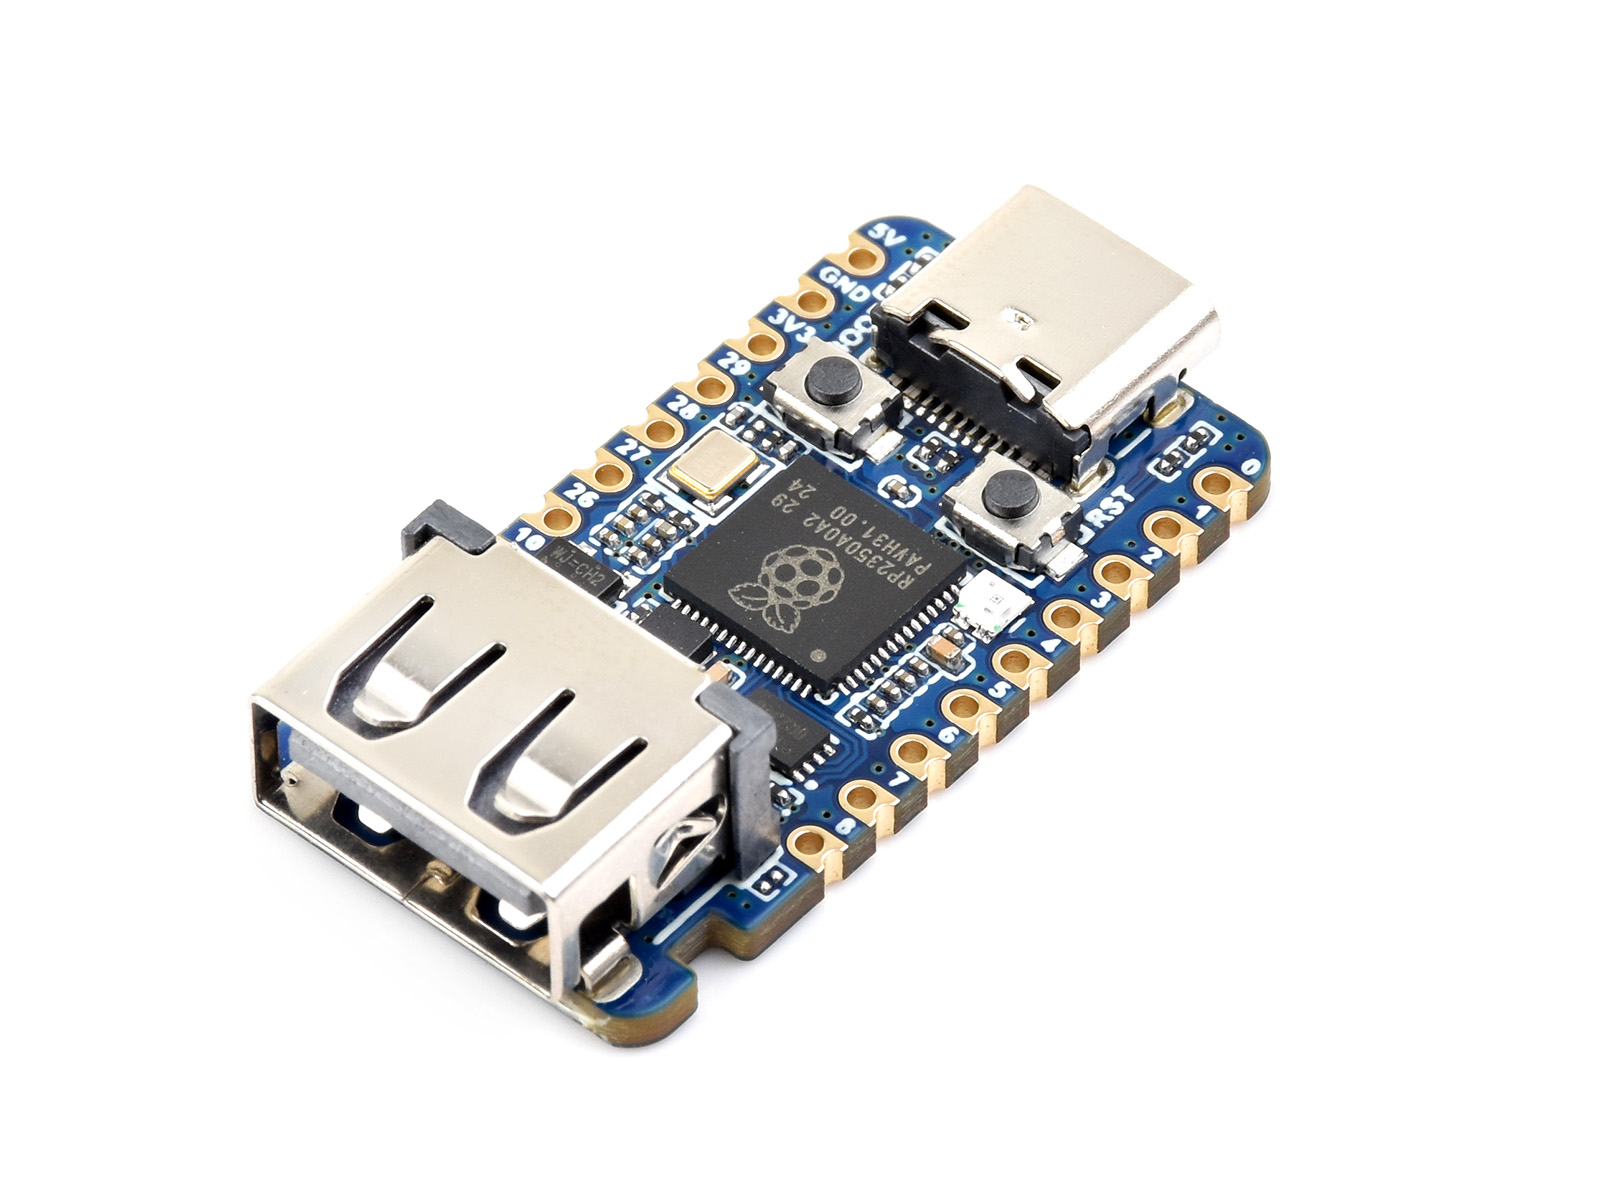
Why the Waveshare RP2350 USB-A Is Recommended
- Built-in USB-A host port.
- No Lightning cable cutting for the standard setup.
- No soldering required.
- The Lightning cable connects directly to the board.
- Cleaner and easier for repeated workshop use.
Raspberry Pi Pico 2 Alternative
If the Waveshare USB-A board is unavailable, Raspberry Pi Pico 2 is a capable alternative. This option requires either a correctly wired Lightning cable or a suitable USB breakout board.

Download the Correct USBLITER8 Firmware
Available USBLITER8 firmware builds cover Waveshare RP2350 USB-A, Waveshare RP2350 Zero, Pimoroni Tiny2350, and Raspberry Pi Pico 2. Use the provided firmware folder and select the file made specifically for your board:
How to Flash USBLITER8 UF2 Firmware
The UF2 installation procedure is similar across the supported RP2350 boards:
- Disconnect the RP2350 board from the computer.
- Press and hold the BOOT or BOOTSEL button.
- While continuing to hold the button, connect the board to the computer.
- Release the button after the board is detected.
- Open the removable drive, which may appear as
RPI-RP2orRP2350. - Copy the UF2 file made specifically for your board onto that drive.
- Wait several seconds while the board writes the firmware and restarts automatically.
Typical package filenames may include:
usbliter8.waveshare_rp2350_usb_a.uf2usbliter8.waveshare_rp2350_zero.uf2usbliter8.pimoroni_tiny2350.uf2usbliter8.pico2.uf2
If the board is not recognized after flashing, return it to BOOTSEL mode and verify that you did not install firmware intended for another model.
Hardware Connection Options
Option 1: Waveshare RP2350 USB-A
This is the simplest connection method. Connect the RP2350 board to the computer, then connect a standard Lightning cable between the board's USB-A host port and the supported Apple device. No cable modification or soldering is required for this setup.
Connection order: Computer → RP2350 USB-A board → Lightning cable → supported Apple device in DFU Mode.
Option 2: Raspberry Pi Pico 2
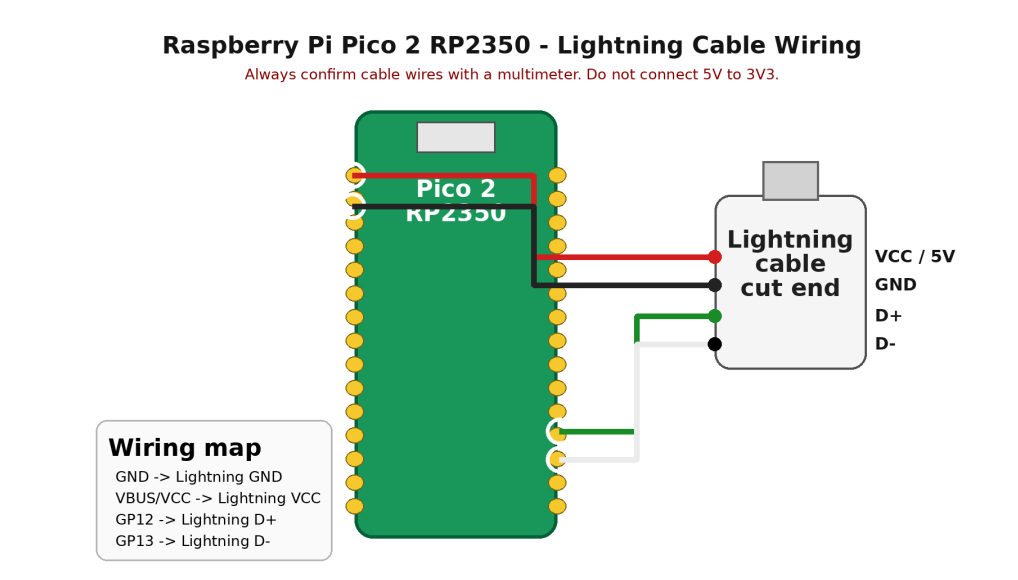
The Pico 2 setup requires an appropriately wired USB connection or a suitable breakout board. USB wire colors are not universal, so technicians must confirm every line using a multimeter and a known pinout instead of trusting color alone.
| Pico 2 Pin | USB Signal |
|---|---|
| VBUS | USB 5V |
| GND | Ground |
| GP12 | D+ |
| GP13 | D− |
Running the Authorized Pwn DFU Service Sequence
After confirming device ownership, correct firmware, and safe wiring, use the documented connection sequence:
- Connect the supported Apple device to the computer.
- Place the device into DFU Mode.
- Power the RP2350 board and wait until its status LED indicates that it is ready.
- Connect the DFU device to the RP2350 board using the appropriate connection method.
- Wait while the board performs the service operation. Do not disconnect power or disturb the cable.
- Continue only after the LED reports a successful completion state.
This guide covers RP2350 preparation only. It does not provide instructions for bypassing Activation Lock, extracting account information, or accessing a device without the owner's authorization.
USBLITER8 LED Status
| LED | Meaning | Action |
|---|---|---|
| Orange | Board ready | Connect the DFU device as instructed. |
| Blinking blue | Operation in progress | Keep the connection stable. |
| Green | Operation completed | Proceed with the authorized repair workflow. |
| Red | Operation failed | Disconnect safely, inspect the setup, and retry. |
Troubleshooting USBLITER8
The RP2350 Drive Does Not Appear
- Try another known-good USB data cable and USB port.
- Hold BOOTSEL before connecting the board.
- Remove unnecessary USB hubs.
- Check whether the board appears in the operating system's device manager.
The LED Turns Red
- Confirm that the Apple device is genuinely in DFU Mode.
- Reconnect the board and device in the recommended order.
- Inspect the Lightning and USB cables.
- Verify D+ and D− if using a wired Pico 2 setup.
- Reflash the correct UF2 firmware for the exact board model.
The Board Works Inconsistently
- Use short, high-quality data cables.
- Avoid loose solder joints and unstable breakout boards.
- Check for a reliable USB power source.
- Switch to the Waveshare RP2350 USB-A board if repeated wiring problems continue.
Frequently Asked Questions
Do I need to flash the UF2 firmware every time?
No. Firmware installation is generally a one-time step. Reflash only when installing an update, changing the board's purpose, or troubleshooting a corrupted or incorrect installation.
Can one UF2 file be used on every RP2350 board?
No. Each supported board has a dedicated firmware build. Installing the wrong file may prevent the board from operating correctly.
Which board is best for beginners?
The Waveshare RP2350 USB-A is the easiest option because its USB host port avoids manual cable wiring and soldering.
Final Notes
USBLITER8 can simplify an RP2350-based Apple service setup when the correct board, firmware, cable, and connection sequence are used. For the safest and most repeatable installation, the Waveshare RP2350 USB-A is the preferred option. Technicians using a Pico 2 should verify every connection electrically before applying power.
Project note: USBLITER8 is a third-party project. GSMUnlockLab provides independent educational documentation and does not claim ownership of the exploit, tool, or firmware.
No comments:
Note: Only a member of this blog may post a comment.